Construction Blog Directory Sparrow Legs Interior Home Renovations in Brittany, France

Pages

Tuesday, 27 January 2015

SparrowLegs Renovates holiday Gite, Collar Beam - End of week 1.

By the middle of the week one, the first floor had been gutted. This gave us a clean canvas to translate the design done on Sweethome 3D to the first floor. This was a rough translation as the real world environment highlighted faults with the CAD design and the inaccuracies with the original measurement plotted on the CAD program. (Actually, this was only out be 30mm max.)


(SweetHome 3D CAD Software)


The existing Ergonomics of ceiling height was to low, sitting at 2.15 meters. Increasing the height was possible, but governed by the Collar beam.

The Collar Beam in this project is under compression rather than tension as it keeps the Common rafters from sagging. If the Collar Beam was a around a third up from the base of Common rafter, then this would have been under tension, preventing the weight of the roof pushing the walls out of possition or the Header Beam (Wall Plate) from detatching from the outer wall. This is also called a Collar tie, generally a misused name for Collar beams under Compression.

(Collar Tie)
 
(Collar Beam)
 
Also another point particular to this project and a factor regarding any decisions moving the Collar beam was the understanding of traditional roofing techniques in rural France. This roof spreads the load on the Wall plate by using a Hammerpost (or internal Sprocket) scarf jointed to the Common rafter. These where both then held into position using a Hammerbeam and some bolts.

(A - Common Rafter, B - Hammerpost, C - Bolt, D - Hammerbeam.)

By measuring the distance between the Ridge beam and the Hammerpost and knowing that the Collar beam in under compression, I was able to increase the ceiling height by 250mm by moving the Collar beam. This wouldn't cause any issues and increases the ceiling height to become standard. (Well, standard in the UK! - In the uk, the standard ceiling height is 2.4 meters, or 8ft - 38mm difference. This height is why plasterboard in the UK 2400mm * 1200mm.

Collar beams raised ready for the new ceiling studwork to be installed on week 2.

Sunday, 25 January 2015

Brittany holiday Gites & cottage Renovations - Week 1

SparrowLegs first week!

Week one has been and passed. In fairness this is the easiest part of any renovations, its to knockdown, remove and clean the existing internal structure.

Recycling of materials.
(Walls Removed - Sorting of materials)


Before anything was removed, for example -Walls, a few things needed to be ascertained and carried out. Disconnecting the electrics and powering of the master Fuse (RCD). I usually disconnect everything, just to be sure that there is no possibility of electrocution when taking down the walls.

Second item to ascertain is working out where you are going to take the waste. This may sound silly but it is important to know this. In France, especially Brittany we don't have the luxury of skips. Not to say they don't exist, but at 600+ Euros per skip, this is expensive and generally difficult to hire.

I have a crap old van, so this gets used and abused, but it does force me to think about wheatI'm disposing of (dues to size and will it fit tin the old girl) and whether anything can be recycled?

Once you have located you nearest dump (dechetterie), its worth popping in and finding out what if any are the weight limits and if materials have to be separated.

Last thing not to forget is disconnecting the water and plugging up any exposed evat (waste pipes.) Working around the smell of shit really doesn't appeal to me, especially the clients! ;)


Removing walls, door and generally anything that isn't holding the house up was done in a day of two. To the inexperienced renovator, this doesn't mean that it's a frenzied attack! You will miss a trick if it were.

When renovating, there is an order to assembling, ceilings, studs, doors, electrics, plumbing, plasterboard etc etc. By removing these items in reverse order you'll be able to stockpile materials such as doors, metal/wood stud and recycle. (This method does take a little longer, but it can pay for itself in reducing the number of trip to the local dump, as well as saving money on buying new materials.


Walls Removed
(Clean and tidy workspace)
 
 
Items needed:
 
Safety gear - Gloves, Glasses, dust mask, etc.
Something to ferry rubbish to the tip - Van/Trailer
Rubble sacks
Hammer, Crowbar (Wrecking bar) Impact Drivers and basic general tools.
MANPOWER!!!


Thursday, 8 January 2015

Central Brittany Holiday Gite Renovation - 10 Week Challenge

The 10 week Challenge!


What's the challenge I hear you say? Renovate 100m2 Gite Cottage in 10 weeks. And when the word renovation is used, I mean complete and utter remodelling of the abortion which was erected 20 plus years ago.

Two guys, a boat load of tools, to rip out and replace everything but the exterior walls and roof. To start off you need to DESIGN!

For a successful build it is important to have some sort of design work finalised, it will never end well if you try and make it up as you go along.

If you're on a budget and can't afford an interior architect, I recommend Sweet Home  3D - http://www.sweethome3d.com/. It can be used in conjunction with other software such as Sketchup, or solely for just mapping out the interior layout.

One key point about designing a layout for a future renovations is it will allow you to estimate to some accuracy the amount of materials one might require.

 (New Layout proposed.)


Thursday, 18 December 2014

Condensation on inside of windows


Great post by Oberon on  - http://www.doityourself.com/forum/doors-skylights-windows/362701-condensation-inside-windows.html

Okay, it is that time of year - here is the really long version!

You have interior condensation on your windows simply because the surface temperature of the window is below the dew point temperature of the air in your home…that’s it…a very simple explanation.

Unfortunately, as to why the surface temperature of your window (glass) is below the dew point temperature of the air in your home may be a bit more complex – so I am going to offer a few thoughts and maybe even throw in a few numbers that I hope might help your situation.

In the summer, when you pull something cold and refreshing out of the refrigerator, and the air is warm and humid, that cold and refreshing beverage container suddenly and quite magically becomes instantly wet – just as soon as it is exposed to the air. What has happened is that the temperature of the container fresh from the refrigerator is below the dew point temperature of the air – which has caused condensation on the outside of that container.

What happens to your windows in the fall and winter is that the surface of the glass is below the dew point temperature of the air in your home – which is causing condensation on the surface of that glass.

Dew point is defined as saturation vapor density...or put in simpler terms, when the air reaches 100% relative humidity and can hold no more moisture.

Relative humidity is, well, relative.

Relative humidity is a comparison of the actual vapor density versus the saturation vapor density at a particular temperature. Put a bit more simply, dew point is 100% relative humidity or the point where the air - at that temperature - is no longer able to hold any more moisture. If the air has reached vapor saturation (100% relative humidity), then the air will release moisture...be it on the outside of that cold beverage container in the summer time, or be it on the interior glass surface of your windows in the winter time, it makes no difference. If the surface temperature happens to be below freezing, then that moisture becomes frost or even ice.

In order to stop condensation from forming on the surface of a window, you either have to lower the dew point temperature of the air in your home to a level below the dew point temperature of the window surface, or you have to warm up the window surface to a temperature above the dew point temperature of your home, or a combination of both.

Lowering the relative humidity of the air in your home may have absolutely no effect on controlling window condensation or it may completely solve your problem – depends on how you lower the relative humidity and what affect the “how” has on both the moisture level of your air and the temperature of your windows. All this because there are two ways to lower relative humidity – first, you can increase the air temperature in your home or second, you can decrease the moisture content of the air in your home.

By increasing the air temperature in your home you will lower the relative humidity but you will not change the dew point – which is based on the amount of water vapor in the air and is not based on the temperature of the air. So, while the RH is lower with higher air temperature, it may not effect condensation on window surfaces at all – unless the rise in air temperature also caused a corresponding rise in window glass temperature to a level above the dew point temperature.

But, lowering the amount of water vapor or moisture in your air will lower the dew point temperature as well. And if it lowers the dew point temperature sufficiently to drop it below the temperature of your window glass – no more condensation issues.

The amount of moisture in the air is measured in grams per cubic meter, which is kind of nice for our metric folks but not so nice for our non-metric folks; but the metric version is much easier on the calculator than the English version. However, in the interest of making this stuff easier to understand for all of us non-metric types, I am going to use Fahrenheit rather than Celsius temperatures in the calculations.

Okay – consider your home at 65 degrees F and with a relative humidity reading of 40%. There are 6.25 grams of water in a cubic meter of air in your home in that particular scenario - which then equates to a dew point temperature of 38 degrees F. So at 38 degrees the air will be at 100% relative humidity or at saturation vapor density.

Now, if your neighbor keeps her house at 75 degrees, but she also has 6.25 grams of water per cubic meter in her air, then the relative humidity in her home is 29% - versus your 40%. But, and here’s the kicker, the dew point temperature in her home is still 38 degrees.

While the relative humidity in her home is much lower than is the relative humidity in yours; if the surface temperature of the windows in her home is 35 degrees she will have condensation on those windows…yet if the surface temperature of your windows is 40 degrees – only five degrees warmer – you will not have condensation on your windows.

So, while her handy humidity gauge reads (correctly) only 29% RH – she has a condensation problem.
While your handy humidity gauge reads (correctly) 40% RH – you don’t have a condensation problem…SWEET…well, for you anyway, not her.

If your home hygrometer measures the relative humidity in your home at 60% while the temperature of your home is 70 degrees, you will have a dew point temperature of about 51 degrees – meaning that if the temperature of the window surface is below 51 degrees then you will have condensation - so now we talk a little more specifically about windows.

The interior surface temperature of a single lite of glass, when the temperature outside is 0 degrees F and the inside air temperature is 70 degrees, will be about 16 degrees.

Add a storm window on the outside and the surface temperature of the inside lite jumps up to about 43 degrees – a huge improvement.

But these are center-of-glass readings and not the temperature readings at the edge of the window where condensation usually forms. A typical clear glass dual pane window is going to have center-of-glass temperature reading pretty much the same as a single pane with a storm – however, if that dual pane has a LowE coating and an argon gas infill then the center-of-glass temperature will be about 57 degrees – a 14 degree improvement over a clear glass dual pane or a single pane with storm window – but again, and more importantly, there will be a comparable edge of glass improvement as well, particularly if the IGU (Insulating Glass Unit) was manufactured using a warm edge spacer system. Also, the dual pane is going to have desiccant between the glass layers. Desiccant absorbs moisture keeping the inside of the dual pane system very dry.

The advantage? If it gets cold enough outside, the temperature in the airspace between the lites can get very low. By keeping that space dry, it helps to keep the dew point temperature very low as well; something not always possible when using a single pane and storm window.

Oddly enough, a single pane with a good and tight frame and sash assembly may be more prone to condensation than will a less tight single pane window simply because air (and moisture) will leak out of the looser window while the tighter window may be more likely to trap the moisture inside the home. And, while a tight storm window can help the interior lite to avoid condensation (when compared with a single lite and no storm), the storm window itself may frost up when the temperature is low enough – at a temperature usually well above the temperature that will cause the dual pane to ice up. It is unavoidable given the right circumstances

So what does a window temperature of 57 degrees mean? Well, as I mentioned earlier a home kept at 70 degrees with a 60% relative humidity has a dew point temperature of 51 degrees so it is much less likely that there will be condensation problem on those particular windows than there would be with a less energy efficient window - despite the relatively high relative humidity in the home.

But, there is always a "but"…

Again, that 57 degree glass temperature is still a center-of-glass reading and the edge of glass temperature will be lower - actual temperature is dependent on both the spacer system used in the IG unit construction and on the material used to construct the sash. So even with a "57 degree" center-of-glass temperature it is still possible to get window condensation if there is enough moisture in the air.

And consider that the interior glass temperatures are based on the fact that moving, warmer, indoor air is actually in contact with the glass at a given time. Curtains, shades, other obstructions can cause problems by blocking airflow across the glass – airflow that can have a huge effect on the condition of the window relating to condensation. Also, bay and bow windows can be more prone to condensation – again because of the possibility of decreased airflow over the glass.

And finally, what can happen to the dew point if you keep your home at 70 degrees and you have a 65% relative humidity? Well, for one thing the dew point has jumped up to 57 degrees which we have already noted is the same as the window temperature. For another thing, anyone with 65% relative humidity in a home at 70 degrees has way too much moisture in their air and they are in serious need of some sort of ventilation system – or at least several good exhaust fans!

Read more: http://www.doityourself.com/forum/doors-skylights-windows/362701-condensation-inside-windows.html#ixzz3MHiQZZ5x

Tuesday, 16 December 2014

Scarf joint rotten floor joist ends in Finistere, Brittany.

How to scarf joint rotten floor joist ends?

In the process of renovating our new home, we noticed one of the gable walls was suffering from Damp. After tracing back, looking for the cause I came across a few joists which had rotten ends. The damp patch on the wall was due to a leaky gutter, allowing water to penetrate down the wall on 2 levels and working its way round the corner stones, thus the damp patch.

After rectifying the gutters, next on the game plan was to fix our rotten floor joists ends.

This subject is as broad as it is wide. Online, you'll find many options as well as different methods of resolving this problem. I'll explain which method of resolution we chose as well as how I executed the fix. This job will not be for everyone but worth being aware of.

In our scenario, the floor joist reside in a street level, north facing room. The room below  is basement level, no windows, and granite dry stone walls. The basement room does suffer from severe humidity which is another topic to talk about in the future.

The street level room has a thin cut solid chestnut tongue and groove flooring. With these environmental ingredients, I knew I didn't want to remove the flooring, experience has told me that French chestnut floors are a pain to remove due to their secret nails and expensive to replace. Using metal hangers with nails would encourage condensation and cause further damage in the future.


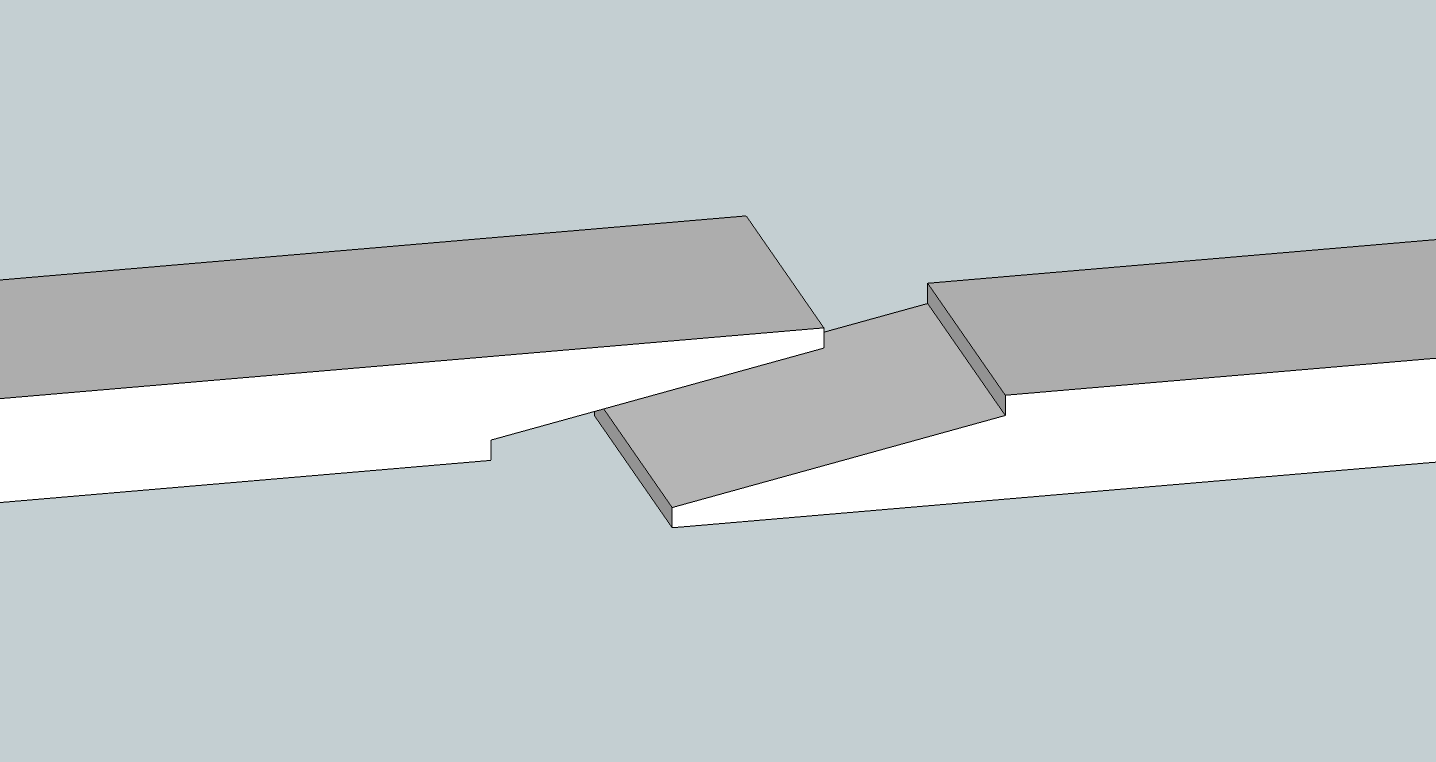
As the property is of a traditional build, not wanting to use anything metal and wanting to carry out the fix on the cheap (one after another unexpencted gremlins all mounts up), I chose to go the old school route and use a nibbed scarf joint.

What is a nibbed scarf joint I hear you cry what were the alternatives?

A Scarf joint is; "Over to you Wiki" -


A scarf joint (also known as a scarph joint) is a method of joining two members end to end in woodworking or metalworking.[1] The scarf joint is used when the material being joined is not available in the length required. It is an alternative to other joints such as the butt joint and the splice joint and is often favored over these in joinery because it yields a barely visible glue line.
 - http://en.wikipedia.org/wiki/Scarf_joint

For this incidience the rotten joist end were cut off and an angle cut is made to bottom of the beam to allow a new part to be bolted (or dowled) on a good distance from the fulcrum point. As stated before it’s a traditional repair, low cost and can be finished to match the original joist.

The alternative methods are -

Joist Repair Plates


Basically using two "L" section steel, slide in the the joist footing well and farsen to the good part of the joist.


Resin Slice Joist


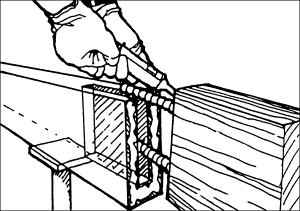
The rotten end of the beam / joist is cut off.  A vertical slot is machined in the joist.  A new joist end is drilled to so two or more steel bars can be glued (Resined) in.  The new end is then fitted with the bars going in to slot. Resin is then poured in to the slot to secure the new beam end. (This looks to be a pain in the ass!)


Replace the whole joist. hmm, I wouldn't want to do this on my tod!


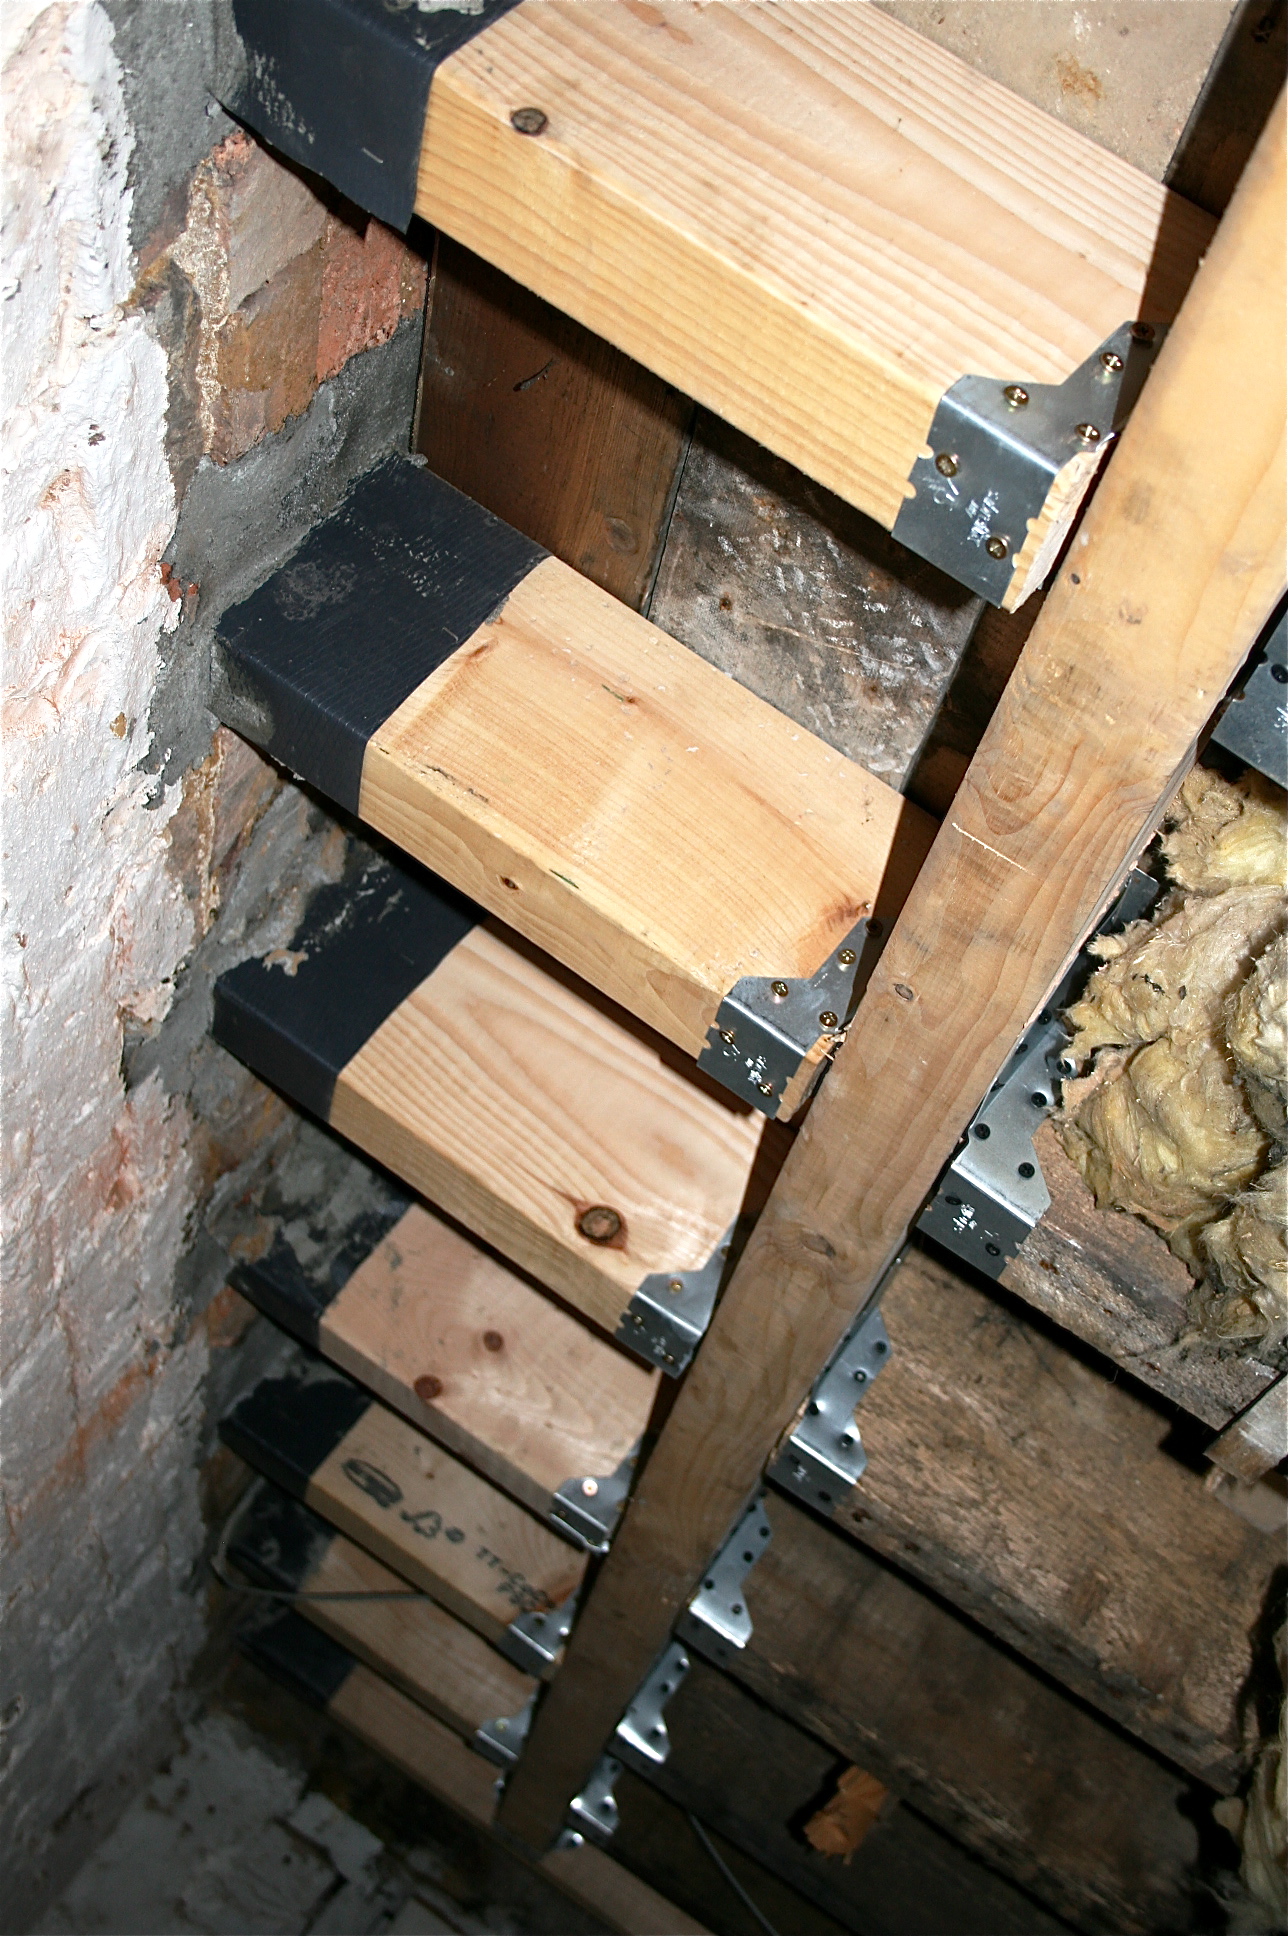
Last option is only viable if you have a run of end joists to repair - Using Hangers.


This picture says a thousand words, though I have noticed they used screws. This is not advisable as the screw heads can and will rip off!


Positives with using a scarf join (Nibbed/Vee'd ends) -
Its cheap
Looks good
Can be done without the use of metal.
The finished flooring doesn't have to be removed in you have access from the underside.


Negatives -
Difficult to cut in situ, up a ladder upside down. Difficult to set out and accurate craftsmanship required.
Quite a few tools required compared with the other methods


How is it done and the method I followed.
Obviously for the benefit of this project I have simplified the procedure... But not by much! It really is an uncomplicated breakthrough allowing new, treated timbers to be installed with the minimum of fuss and disturbance.
Timbers are not all accessible from the same place. While you may be able to get to a floor joist from the top by lifting a section of the floor, it is far easier to access a rafter from underneath.

In the below sequence of images I  have shown the most basic, repairing a floor joist that is accessible from the basement level. 

(Setting out the cut.)
 
(Cut Vertically to the diagonal line.)

(Cut along the setting up lines.) 

 (Chisel, plane & sand till its perfectly flat.)

 (Make a left & right template and map out onto replacement timber.)

(Position, fix using dowel, 90degrees from the diagonal.)
 
Conclusion:
In fairness, this isn't the easiest of jobs. I would've preferred using hangers from an ease point of view. Though more material would have been required, all you would have needed is a saw, and a hammer.
 

"NEXT!"

Monday, 30 June 2014

Carpentry and wood flooring Central Brittany and Finistere

Wood is a great material to work with; I just wish I got to use it more often. Well, soon the worm will turn as I have 65m2 of new wooden flooring to lay. Though this isn’t as demanding as cabinet making, there are many things to consider which affects the look of a room, price of installation and material cost.

(Bespoke Wooden Workspace made 2012)
From the material point of view, my flooring project is price dependent, so I will be using solid Pine boards. I have the intention of painting of staining them in the future, so using a solid hardwood such as oak seems a bit of a waste.
The way you lay the boards can change outcome of a look of a room as well as price. It may seem strange, but the difference of choosing vertical, horizontal or even diagonal lines on the floor really does matters.

The room in question will be the living room, currently it’s divided into a kitchen, hallway, toilet/shower room and a living room. The plan is to knock the walls down to make a large open planned space which will be used as a living space and kitchen area. The space will be long and thin – 13.5m x4m.

As with all jobs, I like to use the computer to design my interiors as it saves money in the long run, give you a feel of what the finished look will be and the proportions of the room.

With a long thin room, you have to think that the way the flooring is set out is not dissimilar to a woman. A more rounded woman would never wear a dress with horizontal stripes as this will accentuate the areas she may not want others to notice. This concept is also true for tall women. Though this time it’s the vertical lines which are generally avoided, as this would make her look monstrously tall.

So before any work commences, I have done a 3D diagram of the three options available to determine my final choice.

(Floor-Boards Length)

(Floor-Boards Width)
The last option is to run the floor boards on the diagonal, this is extravagant due to the extra time it take to lay, however, I have always loved the finish result, especially if you frame the boarders of the room.

(Floor-Boards Diagonal)
 The final consideration of which way you chose to lay my come down to price. As with the diagonal option, choosing a horizontal option is also costly due to the amount of cuts involved and the time it takes. As stated earlier, the room is 13.5m x 4m and the flooring will be 2m x 15.5cm. So on the vertical run, every row two boards will have to be cut, whereas on the horizontal, though it is true that every row to will also require a cut, you will get to lay five to six boards which don’t have to be chopped.


Thursday, 26 June 2014

English Roofer Brittany

Not long ago, I built a new roof from scratch. This was my first roof and luckily it was for a play area, so if it leaked, nothing of value would be ruined. Most of the materials used were new except for the tiles which were reclaimed.

(Central Brittany Slate Roofing project - Play-barn) 

Having the opportunity of building this with both the clients understanding that this was my very first and having the trust in me to complete it was an honour. 

It was a project I always wanted to take on, especially using a traditional roofing material such as slate. I knew the principles of construction and have the skills with putting something of this size together, but nothing is as good as physically building.

Being an interior builder, I have the tools for cutting, shaping and nailing timber together. The only specialist items I had to use was a slate tile cutter and a proper roofing hammer.

(Slate Roofing Hammer & Cutter)

Building the timber frame isn't that dissimilar to building timber stud-work, there are rules to follow with regards to sizes of timber used as-well as the spacing between them.

Tiling is similar tiling a wall or floor, though using Tile hooks (crochets ardoise in French) for fixing not tile adhesive. One thing which isn't similar is the lapping of the tiles, his is something which is quick to learn though.


(Types of slate tile hooks)


Roofs in Brittany background basics

In Central Brittany, it's common to have black slate roofs built on stone walls. Properties are 40 to 50m2 per floor level and a roof of is usually at a 42 degree pitch and a surface area of 50 to 60m2. (And no they don’t follow the golden ratio – 1:1.62!)

The construction is simple. The ridge beam and purlins are generally set in the gable ends, the rafters are then nailed 90 degrees to the ridge and purlins (set 400mm apart, on the rafter centre). Then you have barge board 90 degrees to rafters, with a waterproof membrane (sarking felt) running 90degrees from the boards and tiles sit on top.

(Half Gable Roof in Central Brittany)

(Barge-boards nailed)


Tips and Tricks

Type of ladders - As you can see from the pictures, this roof is a half gable, IE the Ridge beam is against the gable end of the existing building. As such this makes a modern roofing ladder useless as you have nothing to catch onto.
I noticed that the local roofers used wooden Ladders and I quickly pick up the reason why. Using the crochets, you could attach the ladder.

NB There are two types of Crochets as well as many sizes - Crochet Point, you hammer the point into the barge board. Crochet Agrafe hooks over battons instead.

Tile sizes, and mapping out - There is not much to say about tile sizes, usually the size and type of material used depends of the available budget. I was using reclaimed slate tiles 200mm x 300mm, As such, I used 100mm long crochets as this allowed for a 3 overlaps of tiles. 

With regards to mapping out, I did very little in the way of chalk-lining. As the tiles are 300mm and the Crochets are 100mm, you'll generally stay straight and true, though do check once in a while.
 I did ensure that the horizontal and vertical of the timber frame did have a 90 degrees angle on the edges.  

Using the sarking as a guide - When buying sarking, you will notice that it is generally 1100mm in width, you are to overlap the ends 100mm (which the sarking has a printed line as a guide). If you set the guide line 90 degrees from the ridge/top plate or the verges then it becomes a great guide for the tiles.

(Sarking Felt overlay)


How to start off - You start from the bottom and work your way up. With a 300mm length tile I set a 100mm overhang at the bottom. To do this I measure 100mm up from bottom of the barge-board at either end and chalk-lined. Then 101mm parallel above the first line, I chalked again. (The 1mm allow for the 2.7mm thickness of the Crochet.) Repeat this 2 or 3 times and that should be enough.

The first run of tiles I turn 90 degrees and nail. (So the top of the tile lines up with the chalk-line and you have 100mm overhang.)
The second run sit direct on the first set of tiles, but now the correct way round. Both first and second set of tiles should be flush at the bottom and the top of the second run should line up with the second chalkline.

  
How to do your runs - There are two ways of doing your runs, either build up in pyramids of in straight line. I worked out if you laying tiles on your own, then doing straight line of 4 tiles per line, allow you to do 90/100 tiles an hour. If there are two of you, then the pyramid is faster.

(English Builder in Central Brittany - My first Roof)