Construction Blog Directory Sparrow Legs Interior Home Renovations in Brittany, France: English Carpenter Brittany

Pages

Showing posts with label English Carpenter Brittany. Show all posts

Tuesday, 27 January 2015

SparrowLegs Renovates holiday Gite, Collar Beam - End of week 1.

By the middle of the week one, the first floor had been gutted. This gave us a clean canvas to translate the design done on Sweethome 3D to the first floor. This was a rough translation as the real world environment highlighted faults with the CAD design and the inaccuracies with the original measurement plotted on the CAD program. (Actually, this was only out be 30mm max.)


(SweetHome 3D CAD Software)


The existing Ergonomics of ceiling height was to low, sitting at 2.15 meters. Increasing the height was possible, but governed by the Collar beam.

The Collar Beam in this project is under compression rather than tension as it keeps the Common rafters from sagging. If the Collar Beam was a around a third up from the base of Common rafter, then this would have been under tension, preventing the weight of the roof pushing the walls out of possition or the Header Beam (Wall Plate) from detatching from the outer wall. This is also called a Collar tie, generally a misused name for Collar beams under Compression.

(Collar Tie)
 
(Collar Beam)
 
Also another point particular to this project and a factor regarding any decisions moving the Collar beam was the understanding of traditional roofing techniques in rural France. This roof spreads the load on the Wall plate by using a Hammerpost (or internal Sprocket) scarf jointed to the Common rafter. These where both then held into position using a Hammerbeam and some bolts.

(A - Common Rafter, B - Hammerpost, C - Bolt, D - Hammerbeam.)

By measuring the distance between the Ridge beam and the Hammerpost and knowing that the Collar beam in under compression, I was able to increase the ceiling height by 250mm by moving the Collar beam. This wouldn't cause any issues and increases the ceiling height to become standard. (Well, standard in the UK! - In the uk, the standard ceiling height is 2.4 meters, or 8ft - 38mm difference. This height is why plasterboard in the UK 2400mm * 1200mm.

Collar beams raised ready for the new ceiling studwork to be installed on week 2.

Tuesday, 16 December 2014

Scarf joint rotten floor joist ends in Finistere, Brittany.

How to scarf joint rotten floor joist ends?

In the process of renovating our new home, we noticed one of the gable walls was suffering from Damp. After tracing back, looking for the cause I came across a few joists which had rotten ends. The damp patch on the wall was due to a leaky gutter, allowing water to penetrate down the wall on 2 levels and working its way round the corner stones, thus the damp patch.

After rectifying the gutters, next on the game plan was to fix our rotten floor joists ends.

This subject is as broad as it is wide. Online, you'll find many options as well as different methods of resolving this problem. I'll explain which method of resolution we chose as well as how I executed the fix. This job will not be for everyone but worth being aware of.

In our scenario, the floor joist reside in a street level, north facing room. The room below  is basement level, no windows, and granite dry stone walls. The basement room does suffer from severe humidity which is another topic to talk about in the future.

The street level room has a thin cut solid chestnut tongue and groove flooring. With these environmental ingredients, I knew I didn't want to remove the flooring, experience has told me that French chestnut floors are a pain to remove due to their secret nails and expensive to replace. Using metal hangers with nails would encourage condensation and cause further damage in the future.


As the property is of a traditional build, not wanting to use anything metal and wanting to carry out the fix on the cheap (one after another unexpencted gremlins all mounts up), I chose to go the old school route and use a nibbed scarf joint.

What is a nibbed scarf joint I hear you cry what were the alternatives?

A Scarf joint is; "Over to you Wiki" -


A scarf joint (also known as a scarph joint) is a method of joining two members end to end in woodworking or metalworking.[1] The scarf joint is used when the material being joined is not available in the length required. It is an alternative to other joints such as the butt joint and the splice joint and is often favored over these in joinery because it yields a barely visible glue line.
 - http://en.wikipedia.org/wiki/Scarf_joint

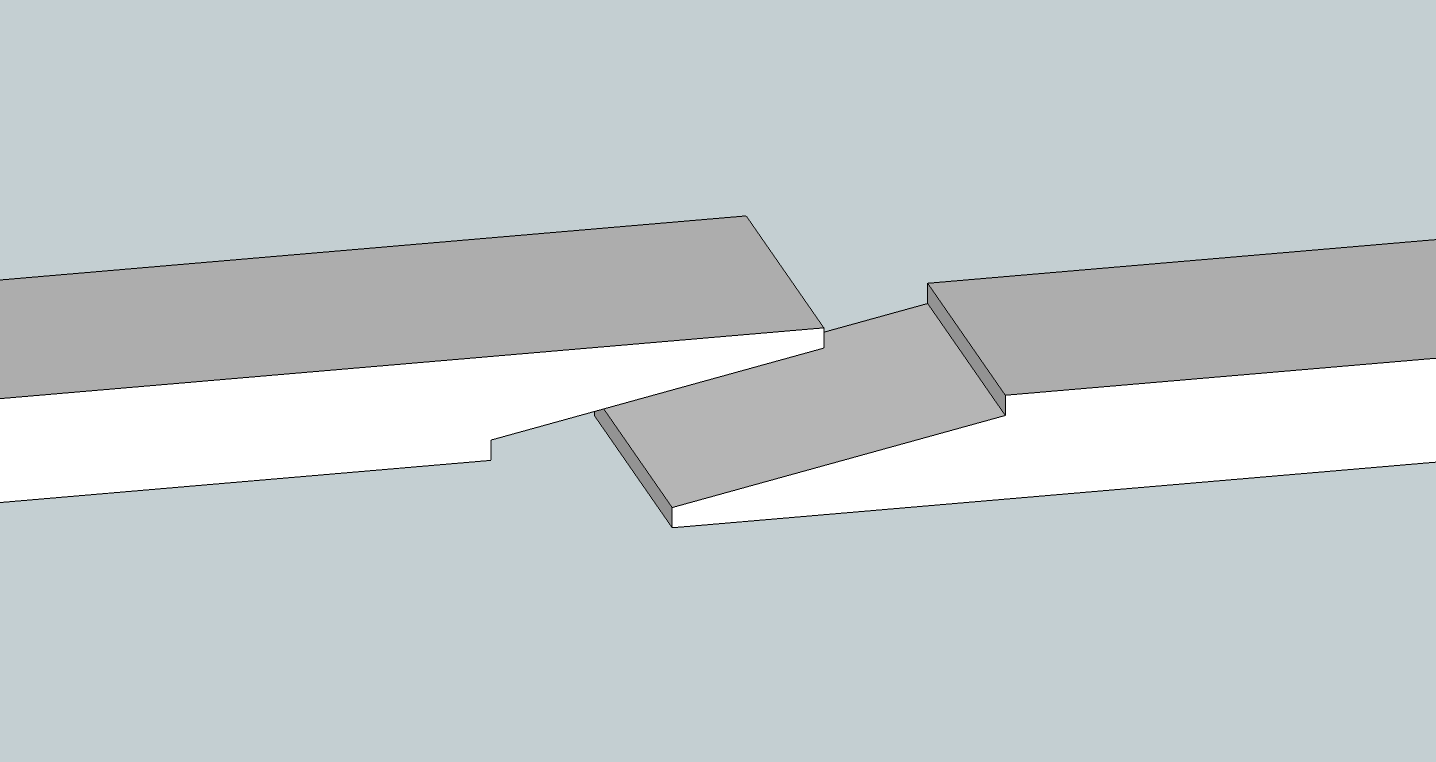
For this incidience the rotten joist end were cut off and an angle cut is made to bottom of the beam to allow a new part to be bolted (or dowled) on a good distance from the fulcrum point. As stated before it’s a traditional repair, low cost and can be finished to match the original joist.

The alternative methods are -

Joist Repair Plates


Basically using two "L" section steel, slide in the the joist footing well and farsen to the good part of the joist.


Resin Slice Joist


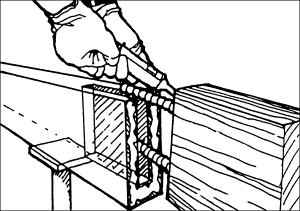
The rotten end of the beam / joist is cut off.  A vertical slot is machined in the joist.  A new joist end is drilled to so two or more steel bars can be glued (Resined) in.  The new end is then fitted with the bars going in to slot. Resin is then poured in to the slot to secure the new beam end. (This looks to be a pain in the ass!)


Replace the whole joist. hmm, I wouldn't want to do this on my tod!


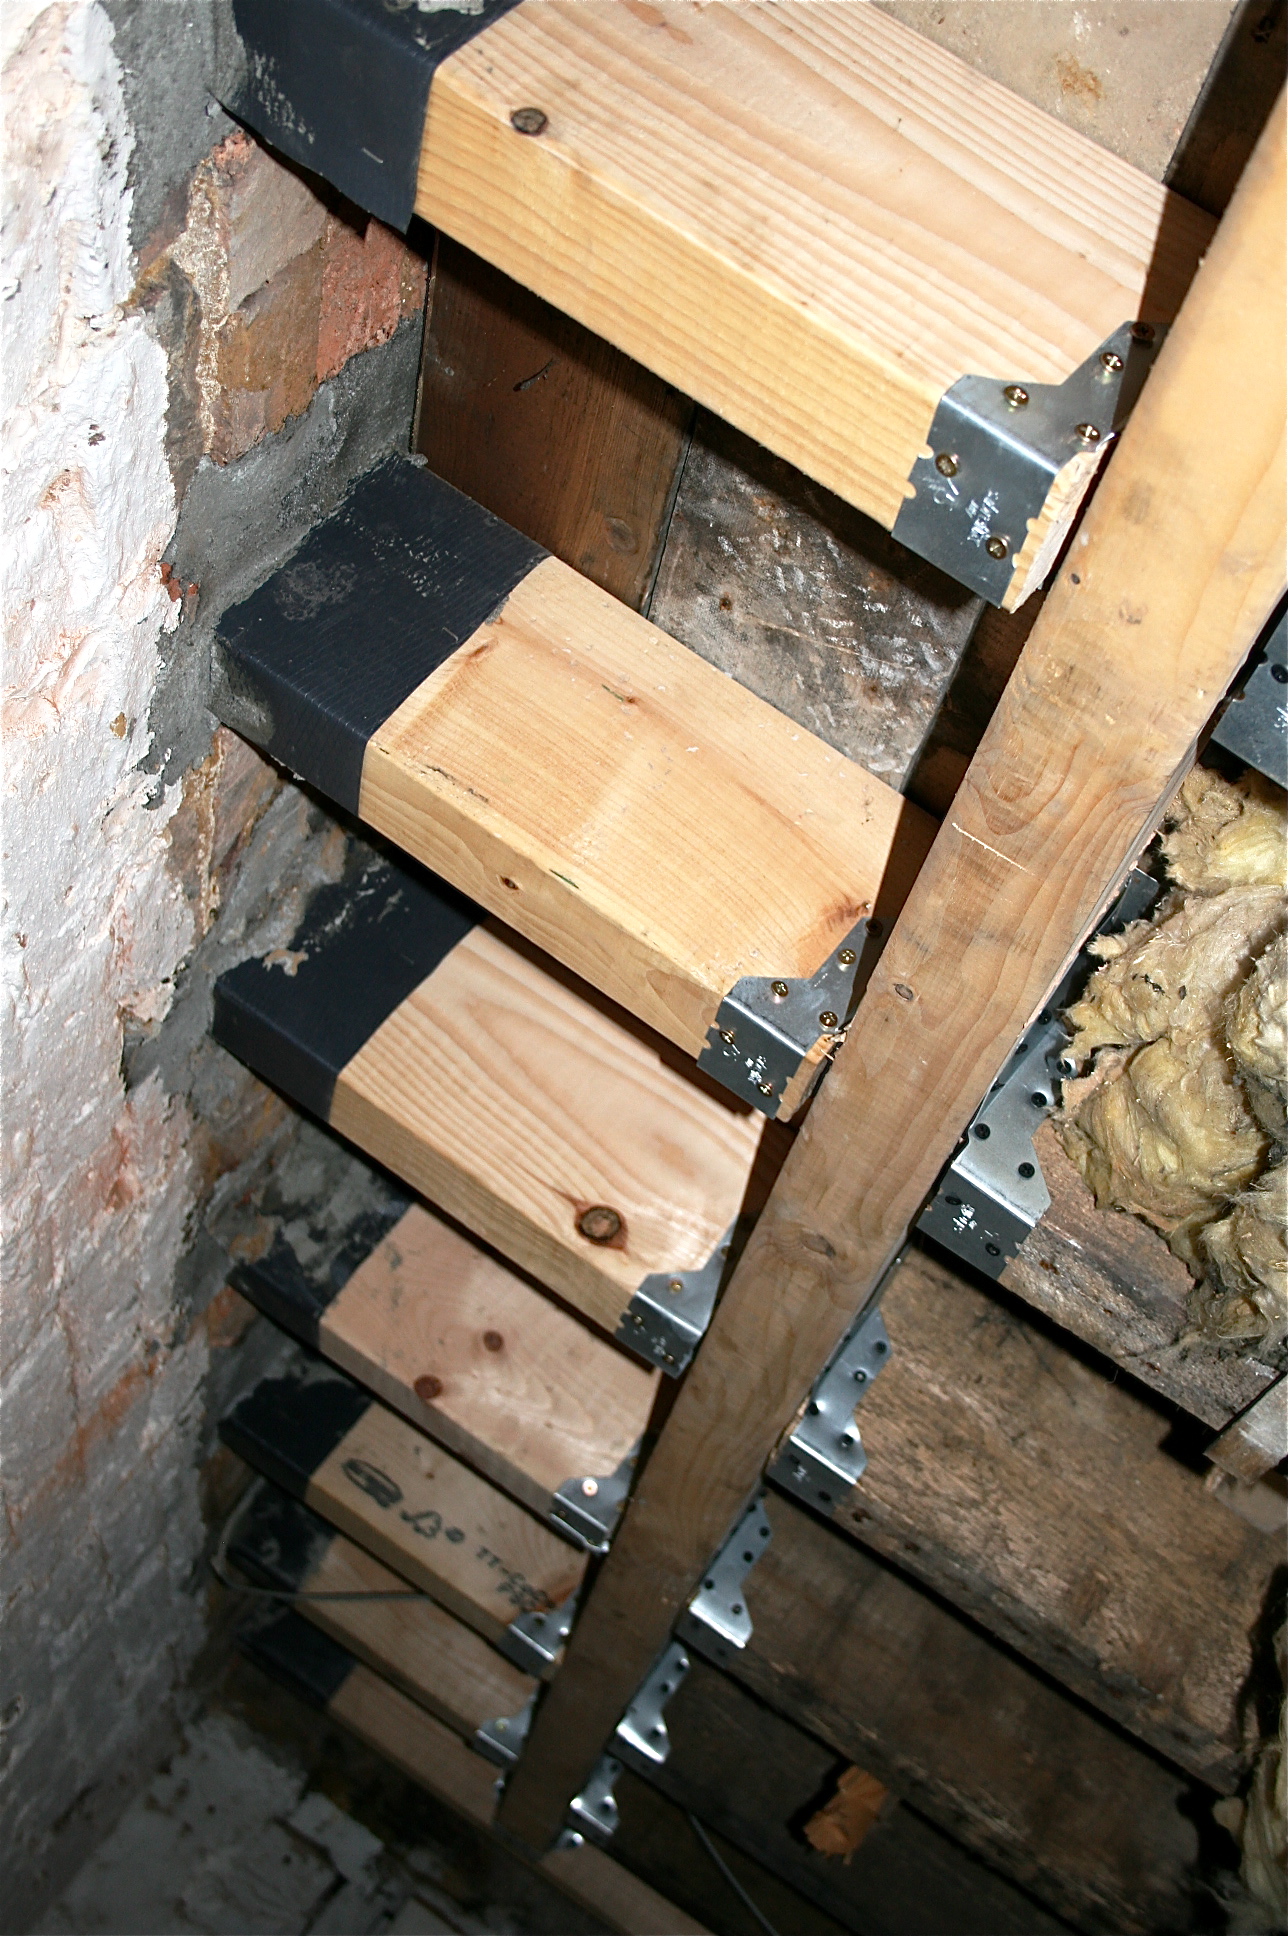
Last option is only viable if you have a run of end joists to repair - Using Hangers.


This picture says a thousand words, though I have noticed they used screws. This is not advisable as the screw heads can and will rip off!


Positives with using a scarf join (Nibbed/Vee'd ends) -
Its cheap
Looks good
Can be done without the use of metal.
The finished flooring doesn't have to be removed in you have access from the underside.


Negatives -
Difficult to cut in situ, up a ladder upside down. Difficult to set out and accurate craftsmanship required.
Quite a few tools required compared with the other methods


How is it done and the method I followed.
Obviously for the benefit of this project I have simplified the procedure... But not by much! It really is an uncomplicated breakthrough allowing new, treated timbers to be installed with the minimum of fuss and disturbance.
Timbers are not all accessible from the same place. While you may be able to get to a floor joist from the top by lifting a section of the floor, it is far easier to access a rafter from underneath.

In the below sequence of images I  have shown the most basic, repairing a floor joist that is accessible from the basement level. 

(Setting out the cut.)
 
(Cut Vertically to the diagonal line.)

(Cut along the setting up lines.) 

 (Chisel, plane & sand till its perfectly flat.)

 (Make a left & right template and map out onto replacement timber.)

(Position, fix using dowel, 90degrees from the diagonal.)
 
Conclusion:
In fairness, this isn't the easiest of jobs. I would've preferred using hangers from an ease point of view. Though more material would have been required, all you would have needed is a saw, and a hammer.
 

"NEXT!"

Monday, 30 June 2014

Carpentry and wood flooring Central Brittany and Finistere

Wood is a great material to work with; I just wish I got to use it more often. Well, soon the worm will turn as I have 65m2 of new wooden flooring to lay. Though this isn’t as demanding as cabinet making, there are many things to consider which affects the look of a room, price of installation and material cost.

(Bespoke Wooden Workspace made 2012)
From the material point of view, my flooring project is price dependent, so I will be using solid Pine boards. I have the intention of painting of staining them in the future, so using a solid hardwood such as oak seems a bit of a waste.
The way you lay the boards can change outcome of a look of a room as well as price. It may seem strange, but the difference of choosing vertical, horizontal or even diagonal lines on the floor really does matters.

The room in question will be the living room, currently it’s divided into a kitchen, hallway, toilet/shower room and a living room. The plan is to knock the walls down to make a large open planned space which will be used as a living space and kitchen area. The space will be long and thin – 13.5m x4m.

As with all jobs, I like to use the computer to design my interiors as it saves money in the long run, give you a feel of what the finished look will be and the proportions of the room.

With a long thin room, you have to think that the way the flooring is set out is not dissimilar to a woman. A more rounded woman would never wear a dress with horizontal stripes as this will accentuate the areas she may not want others to notice. This concept is also true for tall women. Though this time it’s the vertical lines which are generally avoided, as this would make her look monstrously tall.

So before any work commences, I have done a 3D diagram of the three options available to determine my final choice.

(Floor-Boards Length)

(Floor-Boards Width)
The last option is to run the floor boards on the diagonal, this is extravagant due to the extra time it take to lay, however, I have always loved the finish result, especially if you frame the boarders of the room.

(Floor-Boards Diagonal)
 The final consideration of which way you chose to lay my come down to price. As with the diagonal option, choosing a horizontal option is also costly due to the amount of cuts involved and the time it takes. As stated earlier, the room is 13.5m x 4m and the flooring will be 2m x 15.5cm. So on the vertical run, every row two boards will have to be cut, whereas on the horizontal, though it is true that every row to will also require a cut, you will get to lay five to six boards which don’t have to be chopped.


Thursday, 26 June 2014

English Roofer Brittany

Not long ago, I built a new roof from scratch. This was my first roof and luckily it was for a play area, so if it leaked, nothing of value would be ruined. Most of the materials used were new except for the tiles which were reclaimed.

(Central Brittany Slate Roofing project - Play-barn) 

Having the opportunity of building this with both the clients understanding that this was my very first and having the trust in me to complete it was an honour. 

It was a project I always wanted to take on, especially using a traditional roofing material such as slate. I knew the principles of construction and have the skills with putting something of this size together, but nothing is as good as physically building.

Being an interior builder, I have the tools for cutting, shaping and nailing timber together. The only specialist items I had to use was a slate tile cutter and a proper roofing hammer.

(Slate Roofing Hammer & Cutter)

Building the timber frame isn't that dissimilar to building timber stud-work, there are rules to follow with regards to sizes of timber used as-well as the spacing between them.

Tiling is similar tiling a wall or floor, though using Tile hooks (crochets ardoise in French) for fixing not tile adhesive. One thing which isn't similar is the lapping of the tiles, his is something which is quick to learn though.


(Types of slate tile hooks)


Roofs in Brittany background basics

In Central Brittany, it's common to have black slate roofs built on stone walls. Properties are 40 to 50m2 per floor level and a roof of is usually at a 42 degree pitch and a surface area of 50 to 60m2. (And no they don’t follow the golden ratio – 1:1.62!)

The construction is simple. The ridge beam and purlins are generally set in the gable ends, the rafters are then nailed 90 degrees to the ridge and purlins (set 400mm apart, on the rafter centre). Then you have barge board 90 degrees to rafters, with a waterproof membrane (sarking felt) running 90degrees from the boards and tiles sit on top.

(Half Gable Roof in Central Brittany)

(Barge-boards nailed)


Tips and Tricks

Type of ladders - As you can see from the pictures, this roof is a half gable, IE the Ridge beam is against the gable end of the existing building. As such this makes a modern roofing ladder useless as you have nothing to catch onto.
I noticed that the local roofers used wooden Ladders and I quickly pick up the reason why. Using the crochets, you could attach the ladder.

NB There are two types of Crochets as well as many sizes - Crochet Point, you hammer the point into the barge board. Crochet Agrafe hooks over battons instead.

Tile sizes, and mapping out - There is not much to say about tile sizes, usually the size and type of material used depends of the available budget. I was using reclaimed slate tiles 200mm x 300mm, As such, I used 100mm long crochets as this allowed for a 3 overlaps of tiles. 

With regards to mapping out, I did very little in the way of chalk-lining. As the tiles are 300mm and the Crochets are 100mm, you'll generally stay straight and true, though do check once in a while.
 I did ensure that the horizontal and vertical of the timber frame did have a 90 degrees angle on the edges.  

Using the sarking as a guide - When buying sarking, you will notice that it is generally 1100mm in width, you are to overlap the ends 100mm (which the sarking has a printed line as a guide). If you set the guide line 90 degrees from the ridge/top plate or the verges then it becomes a great guide for the tiles.

(Sarking Felt overlay)


How to start off - You start from the bottom and work your way up. With a 300mm length tile I set a 100mm overhang at the bottom. To do this I measure 100mm up from bottom of the barge-board at either end and chalk-lined. Then 101mm parallel above the first line, I chalked again. (The 1mm allow for the 2.7mm thickness of the Crochet.) Repeat this 2 or 3 times and that should be enough.

The first run of tiles I turn 90 degrees and nail. (So the top of the tile lines up with the chalk-line and you have 100mm overhang.)
The second run sit direct on the first set of tiles, but now the correct way round. Both first and second set of tiles should be flush at the bottom and the top of the second run should line up with the second chalkline.

  
How to do your runs - There are two ways of doing your runs, either build up in pyramids of in straight line. I worked out if you laying tiles on your own, then doing straight line of 4 tiles per line, allow you to do 90/100 tiles an hour. If there are two of you, then the pyramid is faster.

(English Builder in Central Brittany - My first Roof)


Sunday, 13 April 2014

Metal or Timber Stud-Work in Central Brittany?

Currently I'm “cutting and nailing sticks together", in other words, installing stud-work in an old countryside house 15km away from Pontivy in Central Brittany. The stud-work is not for partitioning but for adding insulation to the interior walls.

(Timber stud-work Central Brittany)


Stud-work is a supportive framework to partition a space into different areas. When made, it’s a good place to hide all the things you wouldn't want to see, like Electricity cabling, Plumbing and anything else which isn't visually desirable.

In old properties, were insulation is required, for example pre-cavity builds this is a good way to insulate the home. However, this isn't desirable if your home has already been furnished and decorated. (Best to at the start of renovating if you've bought yourself a little countryside wreck!)
Stud-work comes in two forms – Metal and Timber. This made me think, why do I always choose timber for studding walls?

(Metal Stud-Work, Walls and Ceilings) 

Personally I Like wood, it costs the same as metal and it’s just as easy to install. I also believe that if you live in a cooler, wet climate, metal stud can condensate and will eventually blow the plaster.
This point about the condensation however is only related specific circumstances. I.E., if it’s installed against a solid stone exterior wall with no cavity. It is possible to overcome this using a thermal bridge, though most builders rarely use this in private residential jobs.

A positive thing with metal stud-work is the minimal tools required for installation. This means very little training is required with regards to those tools. I use metal stud-work for all ceiling work, due to the material being light weight and being very easy to get level.

List of Pros., Cons & Indifference. (In my opinion)

Wood

Pros.
  • ·        Plaster boards feel firmer when installed
  • ·        The wall doesn’t sound as hollow when taping
  • ·        Able to hang heavy pictures or other object on the studs


Cons.
  • ·        Heavier material to use
  • ·        Requires More tools, which require training.


Metal

Pros.
  • ·        Metal is lighter and easier to transport
  • ·        Requires minimal tools for installation


Cons.
  • ·        Wall sounds tinny and hollow
  • ·        Can’t hang anything heavy in the stud
  • ·        Potential problems with condensation


On paper, the conclusion would suggest the metal is best, especially if you’re a DIYer. But as a professional builder and a traditionalist, I’d still stick to wood. I personally like to think that something which feels solid is better.

Common tools for both materials:
  • ·       Chalk Line Reel
  • ·        Tape Measure
  • ·        Spirit Level
  • ·        Pencil
  • ·        Impact driver
  • ·        Setsquare


Tools required for Wood (My opinion):
  • ·        Mitre saw
  • ·        Gas powered first fix nail gun
  • ·        Hammer


Tools required for Metal:
  • ·        Steel Forge Aviation Tin Snips (I prefer an angle grinder)
  • ·        Stud Crimpers (Used for Locking the stud and track together)


Sunday, 23 March 2014

Oriental inspired bathroom in the French countryside.

I am capable of doing more than just bathrooms, though I seem to be a magnet regarding building them. This one is a little different. For starters, the client is French, not the usual English crowd inhabiting the local area.

From a build and design point of view, again this project was different due to the French culture, which surfaced during the build and dictated the materials chosen, which effected the form.

My brief before starting was that the house was going to be completely renovated for holiday rentals. As such the rooms are to be themed, bedroom one – traditional boat theme, bedroom two – 70’s theme (Laval laps, bright colours etc.). Different themes to be continue throughout, the bathroom being no exception.

My understanding of the client theming the house is a simple; furnishings costs and providing the holidaymaker with a fun experience when on vacation.
When shopping for home furnishings, the bargain items are usually bright, garish, and usually only chosen for small areas within any given room to create a feel, without being overwhelmed. IE Wallpapering just one wall, having a heavy print, is acceptable. Having it throughout the whole room though maybe a little OTT.

My client has taken advantage of the price reductions of these materials and utilised this to his own benefit. If a wall needs 10m2 of tiles, if it’s the same price for the bargain basement plan white or mock bamboo, I like the adventurous option.
So, back to the bathroom – an Oriental inspired bathroom, dictated by the mock straw and bamboo tiles, which there wasn’t enough to cover the whole wall. As this is a price driven project the only readily available tiles left were pebble. And still there wasn't enough of those either.

(Pebble's, Mock Straw & Red Tiles)


The cultural difference in mentality only surfaced when it came to the shower installation. Now I'm cautious about talking about the comparisons between two cultures, though this is the 21st century and I've been living in a foreign county for many years, you do become aware of the differences and it’s enlightening when the root decisions become apparent and effect the finished design.

Back to the shower area, I have a saying, KISS - “keep it simple, stupid”.  No matter what shape or style of the bathroom, I like to get the first fix out the way, and then do the ceiling, walls and then floors in that order not unless it’s a wet room design; floor and then wall as I like the wall tile to sit on the floor tile.

Once the room has taken shape, then the bathroom furniture is fitted and you are finished. If a shower is to be installed, I would use shower glass, never would I build a box in the corner of a room and then add a glass door. What would be the point, it cost more and you lose the clean lines of the room.

Example - 
(Clean Lines)


When asked to box the oriental themed bathroom, I was curious to know the reason why?
The Client explained that as it’s for holiday rentals, he wanted something sturdy and unbreakable. The shower head had to be attached to the ceiling, so it couldn’t be touched, the taps set into the wall so it impossible to fiddle with connections, nor having a bar to pull off the wall. I like some of these features, from a design point of view – giving nice clean lines, but building a wall to surround the shower area so no glass could be broken seem to me to be a little excessive. It costs more in materials – Gypsum Block, more tiles and also the hours of work involved. Whereas installing a piece of glass cost very little, take no time at all to install and easy to replace if needed.

(Gypsum Block - Shower Area)

I’m pleased with the finished product; it is not my usual bathroom installation but I am starting to understand that interior design can be dictated by people preconceptions as well a price. Also this is another bathroom which I have completed within 15 days, starting from scratch. (This room wasn’t a bathroom to start off with.)


Friday, 7 February 2014

How long does it take to build a bathroom?

Over the years this question has even been difficult for me to answer, especially as I have to quote a price for any given building job that I’m looking to do.

However, in the last 12 months, I have built all manners of bathrooms in France (Brittany); from small to large, modern to country style, wet-rooms, and some custom designs with audio speakers, coving and Tadelakt walls and floors.


As a rule of thumb, 150 man hours would be a fair answer; this would include the following work to be completed:


Gutting out the bathroom suit, and removal of any walls.

Trip to the dump and shopping.
 
Stud work and first fix - Electrics and Plumbing.
 
Drylining and plastering.
 
New Evacs for shower, standard or wet-room style.
 
Installation of under floor heating and floor levelling.
Painting of ceiling and walls
 
 
Tiling floors and walls - English Tiler in Brittany
 
Grouting - Boring, but should look great if done with some love!
 
 
Detailing i.e. - wood panelling
Installing or building of storage spaces.
 
Fixtures & Fittings - Baths, shower screens mixers, sinks toilet, lights, fans etc.
Snagging.
 
As you can see, you either need multiple tradesman, or the skills and tools of many different trade. Amazing to think, when its generally one of the smallest rooms in your home.
  • Labourer
  • Electrician
  • Plumber
  • Plasterer
  • Painter
  • Tiler
  • And maybe a Carpenter.
Any questions, email me @: sparrowlegsrenovations@outlook.com